





Jump to Recipe·
[adinserter block=”5″]
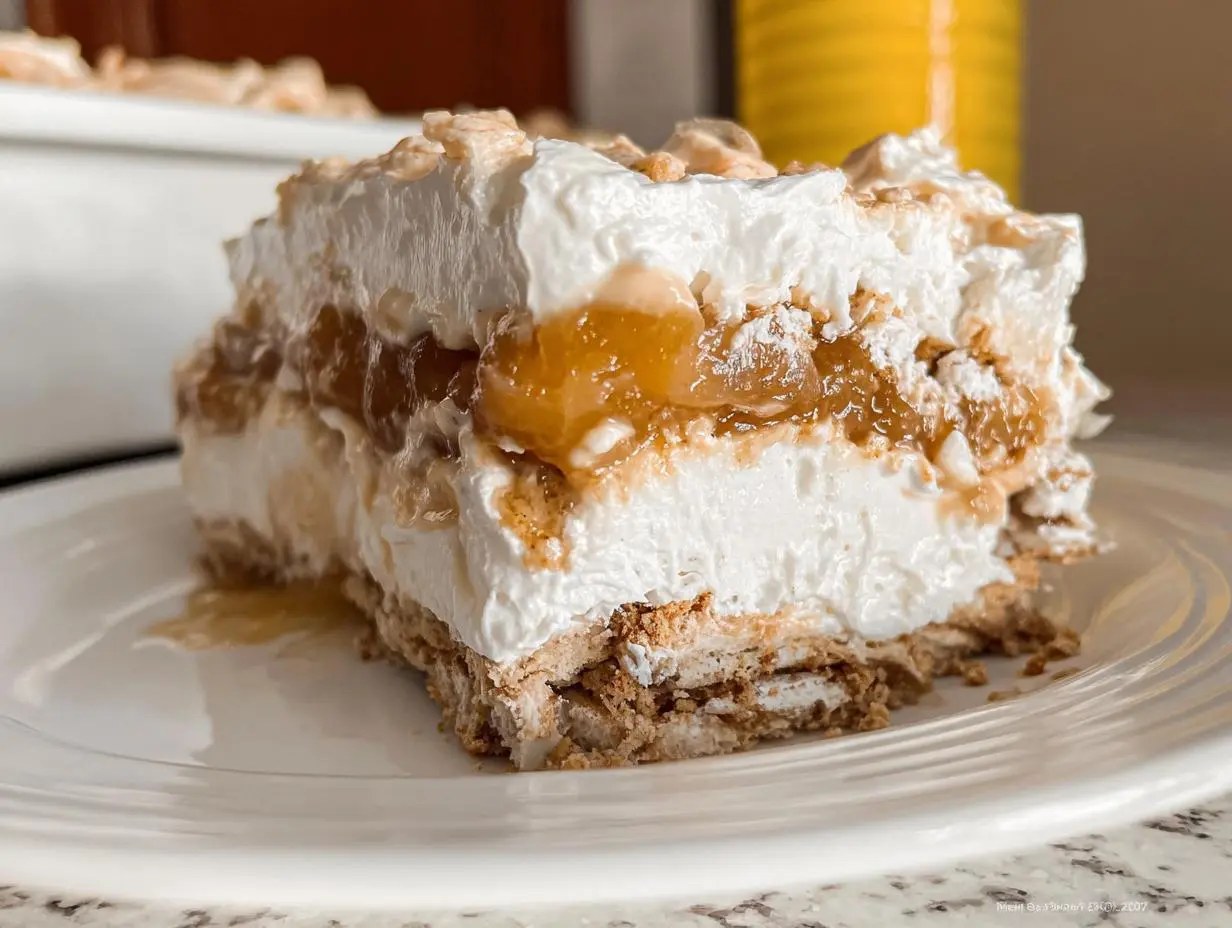
When the craving hits for something that tastes exactly like apple pie but requires zero oven time, you know you need my famous Apple Pie Icebox Cake recipe. Seriously, this is my secret weapon for last-minute potlucks or when I just can’t face turning on the stove in July.
This layered dessert is pure genius because it relies on time, not heat, to transform simple graham crackers into tender, cake-like layers. It’s the ultimate no-bake dessert, and honestly, it’s so easy I feel a little guilty calling it a recipe! I started making this years ago when my kids suddenly decided they wanted dessert five minutes before company arrived. It saved me!
The magic is in the chilling, which lets the spiced apple filling and the sweet cream meld perfectly with those crumbs. Trust me, you’re going to want to clear out some space in your fridge for this beauty.

Pin It
Essential Components for Your Apple Pie Icebox Cake
This Apple Pie Icebox Cake is a study in simplicity, which is why the quality of what you bring home from the store really matters. We aren’t baking anything, so texture is everything! The base needs to be impossibly smooth so it can soak into those crackers properly.
You only need a few core items to make this dream come together. Don’t skip the chilling time; that’s where the real cooking happens! I promise, once you see how few steps this takes, you’ll be making it every weekend.
Cream Cheese Base Ingredients
For our luscious, no-bake filling, you’ll need:
- One whole 8-ounce package of cream cheese, and please make sure it’s fully softened!
- One cup of unsalted butter—that’s two full sticks—also softened until it’s practically melted.
- Two cups of powdered sugar—don’t try to use granulated, it won’t dissolve right!
- One teaspoon of vanilla extract, the real stuff if you have it.
- One 8-ounce container of frozen whipped topping, thawed completely.
Apple and Crumb Components for the Apple Pie Icebox Cake
These are the flavor powerhouses that make it taste like pie! You’ll need:
- One large 21-ounce can of pre-made apple pie filling.
- Two cups of graham cracker crumbs. That usually means crushing about twelve full sheets, so plan ahead!
Step-by-Step Assembly of the Apple Pie Icebox Cake
Putting together this Apple Pie Icebox Cake is just like building a delicious, edible LEGO set, except way better! We start with the cream, build our layers, and then let the fridge do all the hard work. Remember, we aren’t baking, so mixing gently is key to keeping that airy texture.
Preparing the Cream Filling Base
First things first, grab your biggest mixing bowl. You need to beat that softened cream cheese and the two sticks of softened butter together until they are completely smooth. I mean it—no lumps allowed! If your butter is cold, you’ll end up with little hard bits in the final product, and that’s a disaster.
Next, slowly stream in your powdered sugar and that teaspoon of vanilla extract while the mixer is running on low. Once it’s all combined and looks pale and fluffy, it’s time for the whipped topping. This needs a light touch! Gently fold in the thawed whipped topping. You want to mix just until you don’t see any white streaks left from the topping. Don’t overmix here, or you’ll deflate all that lovely air we just whipped in!
Layering Your No Bake Dessert
Now for the fun part: assembly in your 9×13 dish. Start by spreading just a thin, even layer of that gorgeous cream mixture right over the bottom of the pan. Think of it as the glue that holds everything together.
Once the bottom is covered, sprinkle a layer of your graham cracker crumbs evenly over the cream. Don’t make any big hills! Next, spread half of that canned apple pie filling right over the crumbs. It should look rustic and messy, that’s fine!
We repeat the process: another layer of cream mixture, then another layer of graham crumbs, and then the rest of that sweet apple filling goes on top. Finally, you cover everything with the last bit of your cream mixture, spreading it out smoothly across the top. Sprinkle any extra crumbs you have left lightly over the very top for decoration.

Pin It
Chilling for Optimal Texture
This is the most important step for any icebox cake, especially one using graham crackers. Cover the whole dish tightly with plastic wrap. We need this cake to chill for a minimum of six hours, but honestly, if you can leave it overnight, you’ll be rewarded ten times over! This long chill time is what allows the moisture from the cream and filling to penetrate the graham crackers, turning them from hard crackers into something wonderfully soft, just like a real cake layer. Don’t rush the chilling!
Tips for Making the Best Apple Pie Icebox Cake
Even though this is a no-bake recipe, there are still a few things you need to pay attention to if you want your Apple Pie Icebox Cake to be absolutely perfect. I’ve made this way too many times—especially when I was too lazy to turn on the oven—and I’ve learned a few tricks to avoid common pitfalls.
The biggest mistake people make is thinking they can just toss soft ingredients into the bowl. Nope! The texture of the final product relies 100% on how well you cream the base ingredients first.
Ingredient Preparation Matters
When the recipe calls for softened cream cheese and butter, it means it! If the butter is too cold, it won’t incorporate the sugar properly, and you’ll end up with a grainy, separated filling. Set them out on the counter for at least an hour before you even think about mixing. You want them soft enough that you can easily press a finger into them, but they shouldn’t be greasy or melted looking. That perfect texture is what helps trap air when you beat them, leading to a lighter cream mixture.
Graham Cracker Substitution Ideas
While standard graham crackers work beautifully, if you want to amp up that spiced pie flavor in your Apple Pie Icebox Cake, I highly recommend using cinnamon graham crackers instead! They add an extra little kick of spice that really complements the canned apple filling. You can usually find them right next to the regular ones. If you use them, you might want to skip adding extra cinnamon to the cream mixture, just to keep things balanced.
Equipment Needed for This Layered Dessert
You don’t need fancy gadgets for this layered dessert, which is part of the charm! You’ll definitely want a large mixing bowl and an electric hand mixer, or stand mixer if you have one, to get that cream base smooth. A sturdy rubber spatula is essential for folding in the whipped topping without deflating it. And of course, you need a 9×13 inch baking dish to build all those gorgeous layers. Don’t forget the plastic wrap for covering it up tightly before it heads to the fridge!
Storing Leftover Apple Pie Icebox Cake
If you manage to have any Apple Pie Icebox Cake left over—which is rare in my house—storage is simple. Make sure any remaining slices are tightly covered with plastic wrap or placed in an airtight container. Because this dessert relies on chilling, it actually tastes better the next day once those graham crackers have fully softened up. You can safely keep this in the refrigerator for about three to four days. Any longer than that, and the cracker layers might start getting a little too mushy for my liking, though honestly, it never lasts that long!
Frequently Asked Questions About Apple Pie Icebox Cake
Readers always have the best questions about this specific Apple Pie Icebox Cake, especially since it’s no-bake! Here are the ones I get asked most often:
Can I make this Apple Pie Icebox Cake ahead of time?
Oh yes, you absolutely should! This is the perfect make-ahead dessert. I usually assemble the whole thing the morning before a party or the night before. Giving it that full overnight chill ensures the graham crackers are perfectly tender. It’s the best kind of party prep because you aren’t stressing on serving day!
What is the best way to slice the chilled cake?
Because this layered dessert is so creamy, slicing can get messy if you just use a regular knife. Here’s my trick: run your sharpest knife under very hot water for about thirty seconds, wipe it dry quickly, and then slice. The heat cuts right through the layers cleanly. Wipe the knife clean between every slice for perfect presentation!
[adinserter block=”7″]
Can I use fresh apples instead of filling?
You certainly can try, but you have to treat them first! If you use fresh apples, you can’t just layer them in raw. You’d need to chop them finely, sauté them with sugar, cinnamon, and maybe a little cornstarch to create a thick sauce first. Since a big part of this easy apple dessert’s simplicity is using the canned filling, I usually stick to that unless I have extra time to cook down my own spiced apples.
Understanding the Nutrition of This Easy Apple Dessert
Since this is a rich, creamy, no-bake dessert, we need to keep an eye on things, even though we are enjoying ourselves! Based on the ingredients and getting 12 generous servings from the whole dish, each slice of this easy apple dessert comes out to roughly 350 calories. It does contain about 40 grams of sugar, mostly coming from the powdered sugar and the pie filling itself. Keep in mind this is an estimate, especially if you use different brands of graham crackers or whipped topping. Enjoy it as the perfect treat!
Share Your Apple Pie Icebox Cake Creations
I truly hope you enjoy making this incredibly simple Apple Pie Icebox Cake as much as my family does! It’s the ultimate summer crowd-pleaser. When you whip up a batch, please come back here and leave a rating below—it helps other home cooks know this recipe is worth trying. If you snap a picture of your perfectly layered dessert, tag me on social media! I love seeing your creations!
Tips for Making the Best Apple Pie Icebox Cake
Even though this is a no-bake recipe, there are still a few things you need to pay attention to if you want your Apple Pie Icebox Cake to be absolutely perfect. I’ve made this way too many times—especially when I was too lazy to turn on the oven—and I’ve learned a few tricks to avoid common pitfalls.
The biggest mistake people make is thinking they can just toss soft ingredients into the bowl. Nope! The texture of the final product relies 100% on how well you cream the base ingredients first.
Ingredient Preparation Matters
When the recipe calls for softened cream cheese and butter, it means it! If the butter is too cold, it won’t incorporate the sugar properly, and you’ll end up with a grainy, separated filling. Set them out on the counter for at least an hour before you even think about mixing. You want them soft enough that you can easily press a finger into them, but they shouldn’t be greasy or melted looking. That perfect texture is what helps trap air when you beat them, leading to a lighter cream mixture.
Graham Cracker Substitution Ideas
While standard graham crackers work beautifully, if you want to amp up that spiced pie flavor in your Apple Pie Icebox Cake, I highly recommend using cinnamon graham crackers instead! They add an extra little kick of spice that really complements the canned apple filling. You can usually find them right next to the regular ones. If you use them, you might want to skip adding extra cinnamon to the cream mixture, just to keep things balanced.
Equipment Needed for This Layered Dessert
You don’t need fancy gadgets for this layered dessert, which is part of the charm! You’ll definitely want a large mixing bowl and an electric hand mixer, or stand mixer if you have one, to get that cream base smooth. A sturdy rubber spatula is essential for folding in the whipped topping without deflating it. And of course, you need a 9×13 inch baking dish to build all those gorgeous layers. Don’t forget the plastic wrap for covering it up tightly before it heads to the fridge!
Storing Leftover Apple Pie Icebox Cake
If you manage to have any Apple Pie Icebox Cake left over—which is rare in my house—storage is simple. Make sure any remaining slices are tightly covered with plastic wrap or placed in an airtight container. Because this dessert relies on chilling, it actually tastes better the next day once those graham crackers have fully softened up. You can safely keep this in the refrigerator for about three to four days. Any longer than that, and the cracker layers might start getting a little too mushy for my liking, though honestly, it never lasts that long!
Frequently Asked Questions About Apple Pie Icebox Cake
Readers always have the best questions about this specific Apple Pie Icebox Cake, especially since it’s no-bake! Here are the ones I get asked most often:
Can I make this Apple Pie Icebox Cake ahead of time?
Oh yes, you absolutely should! This is the perfect make-ahead dessert. I usually assemble the whole thing the morning before a party or the night before. Giving it that full overnight chill ensures the graham crackers are perfectly tender. It’s the best kind of party prep because you aren’t stressing on serving day!
What is the best way to slice the chilled cake?
Because this layered dessert is so creamy, slicing can get messy if you just use a regular knife. Here’s my trick: run your sharpest knife under very hot water for about thirty seconds, wipe it dry quickly, and then slice. The heat cuts right through the layers cleanly. Wipe the knife clean between every slice for perfect presentation!
Can I use fresh apples instead of filling?
You certainly can try, but you have to treat them first! If you use fresh apples, you can’t just layer them in raw. You’d need to chop them finely, sauté them with sugar, cinnamon, and maybe a little cornstarch to create a thick sauce first. Since a big part of this easy apple dessert’s simplicity is using the canned filling, I usually stick to that unless I have extra time to cook down my own spiced apples.
Understanding the Nutrition of This Easy Apple Dessert
Now, I’m not one to obsess over numbers when it comes to dessert, but since this layered dessert is so rich, it’s good to have a ballpark idea! If you divide this whole Apple Pie Icebox Cake into 12 generous slices, you’re looking at about 350 calories per serving. It’s got about 40 grams of sugar, which is mostly from the powdered sugar and that sweet apple filling we use.
Keep in mind that this is just an estimate, you guys! If you use a different brand of whipped topping or crushed your graham crackers a little thinner, those numbers might shift slightly. Just enjoy it for what it is—a fantastic, easy treat!
Share Your Apple Pie Icebox Cake Creations
I truly hope you enjoy making this incredibly simple Apple Pie Icebox Cake as much as my family does! It’s the ultimate summer crowd-pleaser. When you whip up a batch, please come back here and leave a rating below—it helps other home cooks know this recipe is worth trying. If you snap a picture of your perfectly layered dessert, tag me on social media! I love seeing your creations!
Shocking Apple Pie Icebox Cake in 4 Easy Steps
5 Stars 4 Stars 3 Stars 2 Stars 1 Star
No reviews
A simple, no-bake dessert featuring layers of graham crackers, spiced apple filling, and whipped cream, resembling an apple pie in a cool, layered cake form.
- Author: Recipes Deal
- Prep Time: 25 minutes
- Cook Time: 0 minutes
- Total Time: 6 hours 25 minutes
- Yield: 12 servings 1x
- Category: Dessert
- Method: No Bake
- Cuisine: American
- Diet: Vegetarian
Ingredients
Scale
- 1 (8 ounce) package cream cheese, softened
- 1 cup (2 sticks) unsalted butter, softened
- 2 cups powdered sugar
- 1 teaspoon vanilla extract
- 1 (8 ounce) container frozen whipped topping, thawed
- 1 (21 ounce) can apple pie filling
- 2 cups graham cracker crumbs (about 12 full sheets)
INSIDE_INGREDIENTS
Cook Mode Prevent your screen from going dark
Instructions
- In a large bowl, beat the softened cream cheese and butter until smooth.
- Gradually add the powdered sugar and vanilla extract, mixing until fully combined.
- Gently fold in the thawed whipped topping until no streaks remain.
- In a 9×13 inch baking dish, spread a thin layer of the cream mixture on the bottom.
- Sprinkle a layer of graham cracker crumbs over the cream.
- Spoon half of the apple pie filling evenly over the crumbs.
- Repeat the layers: cream mixture, graham cracker crumbs, and the remaining apple pie filling.
- Finish with a final layer of the cream mixture, spreading it evenly over the top.
- Sprinkle any remaining graham cracker crumbs lightly over the top layer.
- Cover the dish with plastic wrap.
- Refrigerate for at least 6 hours, or preferably overnight, before slicing and serving.
Notes
- You can substitute cinnamon graham crackers for extra flavor.
- Make sure the cream cheese and butter are fully softened for a smooth mixture.
- Allow the cake to chill long enough for the graham crackers to soften properly.
Nutrition
- Serving Size: 1 slice
- Calories: 350
- Sugar: 40g
- Sodium: 200mg
- Fat: 18g
- Saturated Fat: 10g
- Unsaturated Fat: 8g
- Trans Fat: 0g
- Carbohydrates: 45g
- Fiber: 1g
- Protein: 4g
- Cholesterol: 45mg
[adinserter block=”6″]